All About KubeSphere With Air-gapped Installation
Guidelines to get started with KubeSphere


Table of contents
- Why do we need KubeSphere?
- KubeSphere Ecosystem Tools
- Deep Dive With KubeSphere- features
- Kubesphere Installation
- Air-gapped Installation on Kubernetes
- Reference And Conclusion
Why do we need KubeSphere?
So, if you are to struggling with building and managing cloud-native applications and Kubernetes clusters, well look no further KubeSphere is here to help you out. It is a distributed operating system for cloud-native application management, using Kubernetes as its kernel. It provides a plug-and-play architecture, allowing third-party applications to be seamlessly integrated into its ecosystem.
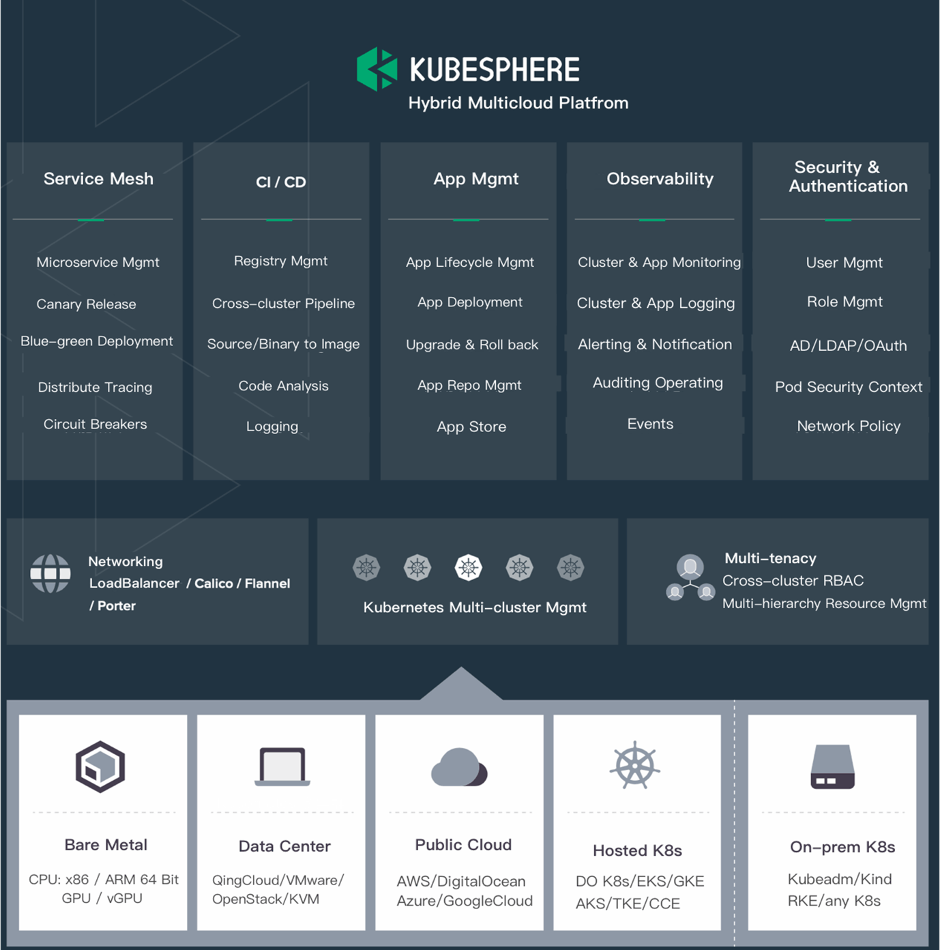
The most interesting part is it boasts the most common functionalities needed for enterprise Kubernetes strategies, such as Kubernetes resource management, DevOps (CI/CD), application lifecycle management, monitoring, logging, service mesh, multi-tenancy, alerting and notification, auditing, storage and networking, autoscaling, access control, GPU support, multi-cluster deployment and management, network policy, registry management, and security management.
KubeSphere provides high-performance and scalable container service management for enterprises. It aims to help them accomplish digital transformation driven by cutting-edge technologies, and accelerate app iteration and business delivery to meet the ever-changing needs of enterprises.
Imp note: If you want to create Kubernetes cluster/K3s and eager to quickly deploy in an offline environment-- KUBEKEY
KubeKey
KubeKey is an open-source lightweight tool for deploying Kubernetes clusters. It provides a flexible, rapid, and convenient way to install Kubernetes/K3s only, both Kubernetes/K3s and KubeSphere, and related cloud-native add-ons. It is also an efficient tool to scale and upgrade your cluster.
In addition, KubeKey also supports customized Air-Gap package
Use Cases of KubeKey:
Simple three steps
Install Kubernetes/K3s only
Install Kubernetes/K3s and KubeSphere together in one command
Install Kubernetes/K3s first, then deploy KubeSphere on it using ks-installer
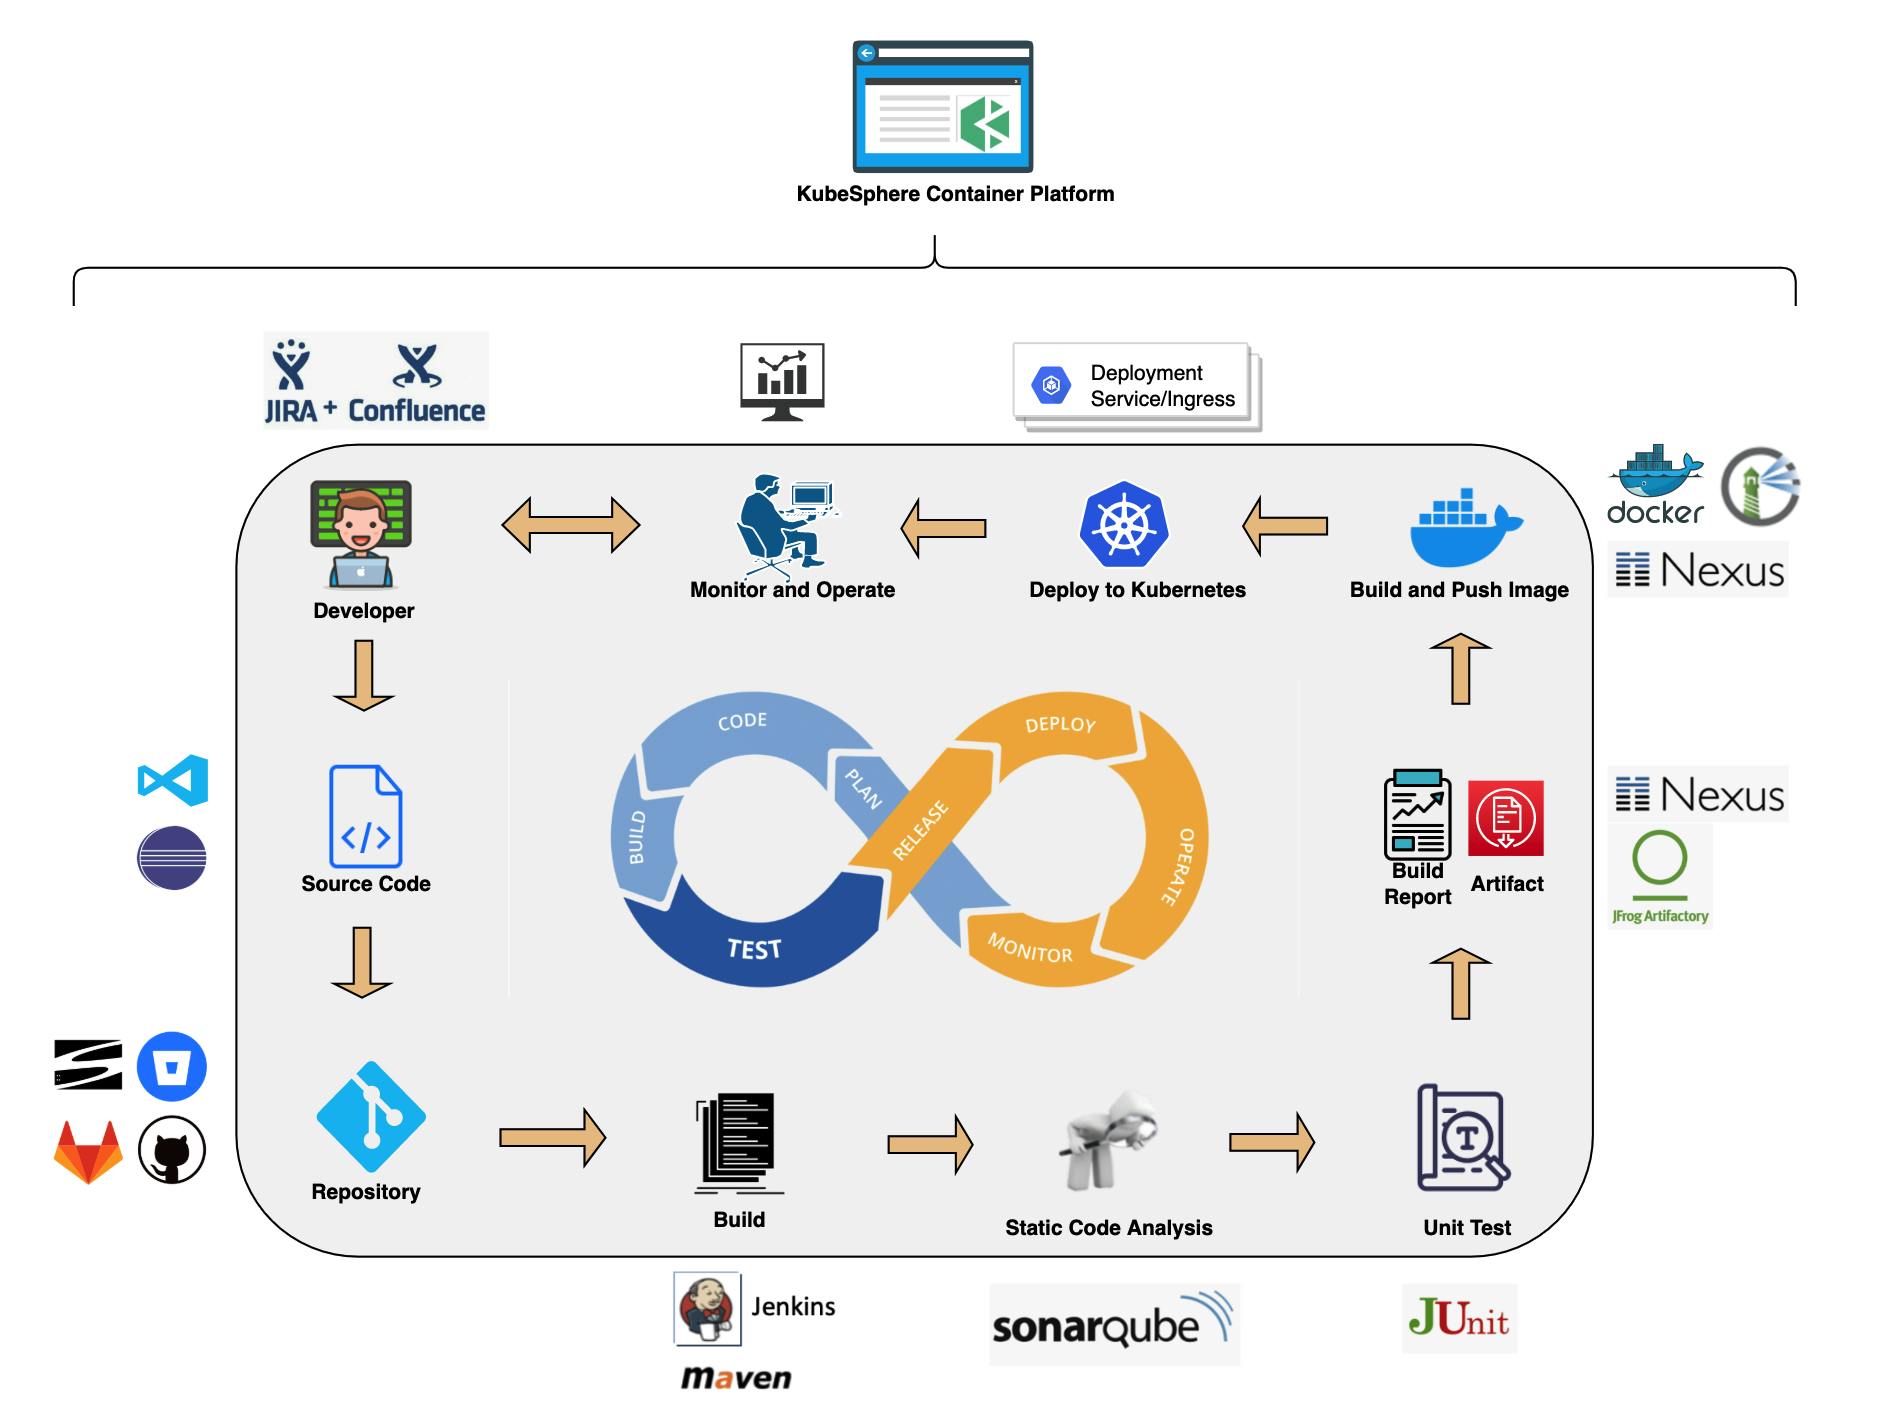
KubeSphere Ecosystem Tools
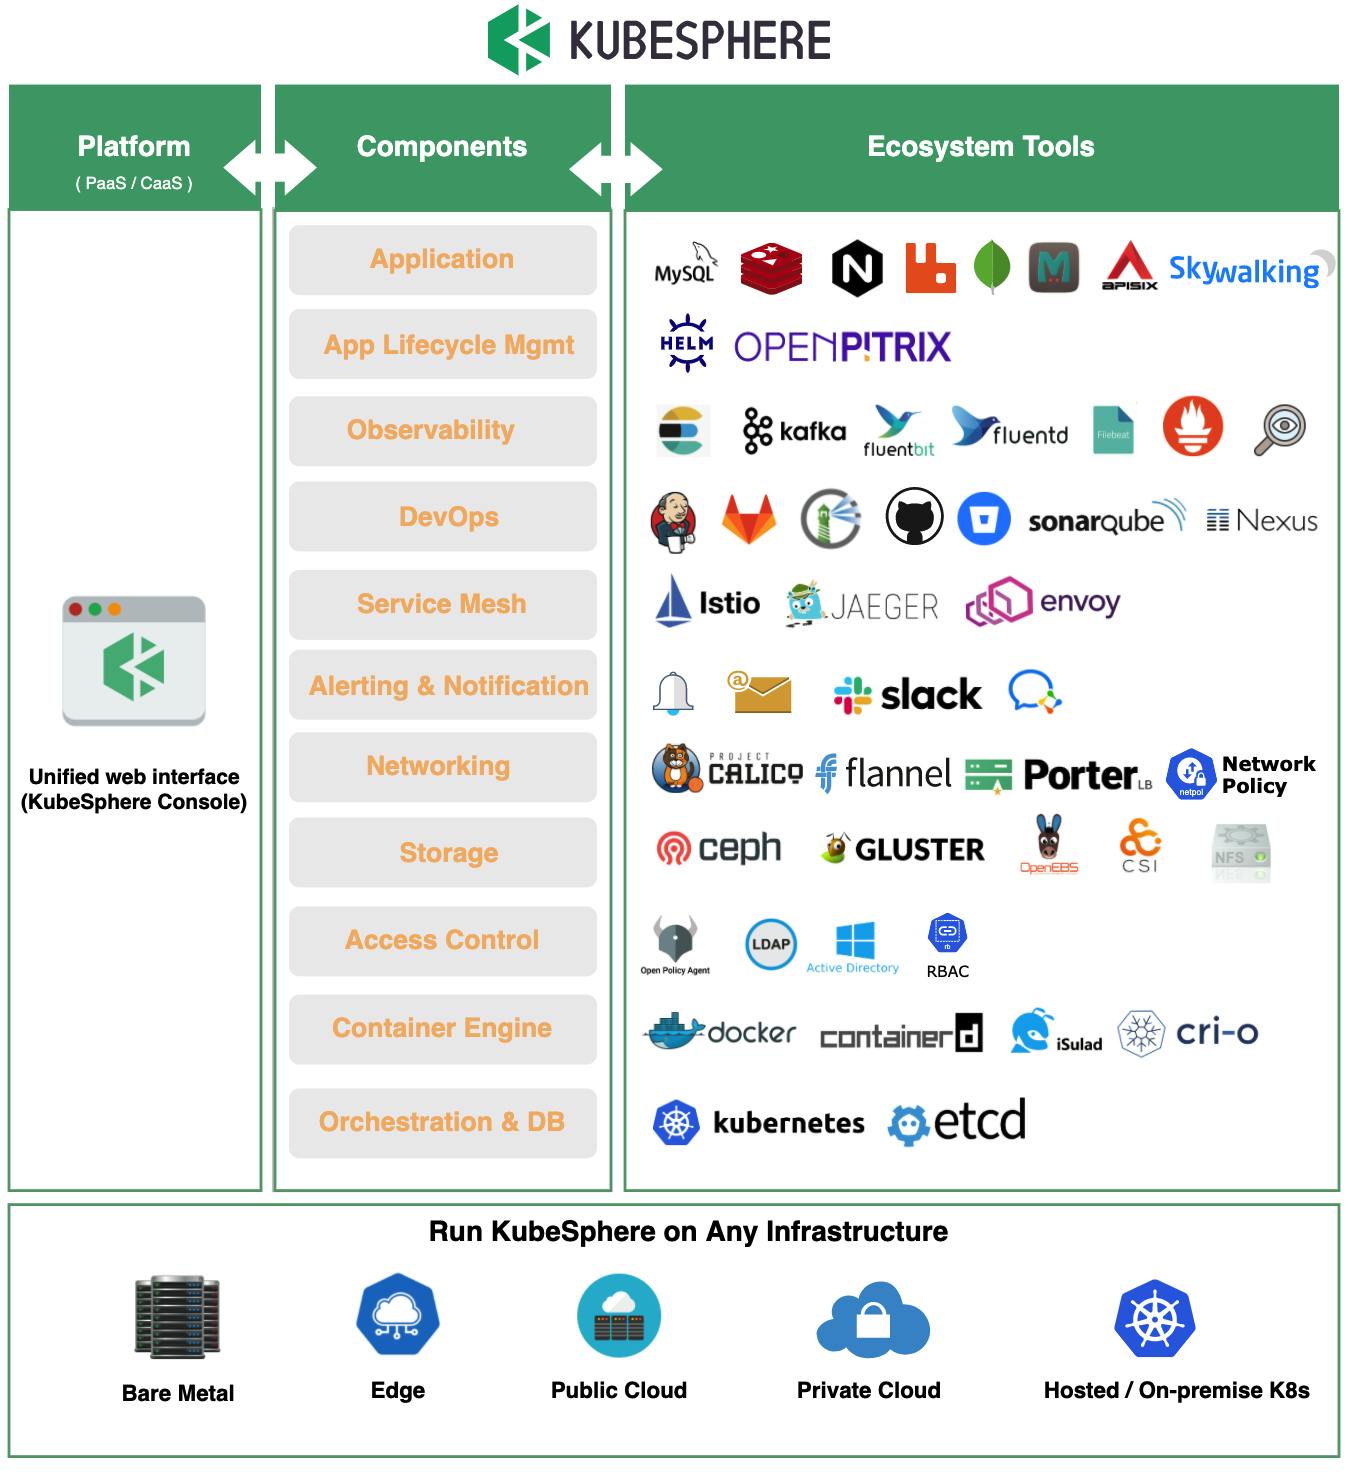
So, KubeSphere integrates a wide range of ecosystem tools related to Kubernetes. This open-source projects serve as the backend components of KubeSphere, which interact with the KubeSphere console through standard APIs, thus providing consistent user experiences to reduce complexity. KubeSphere allows developers and DevOps teams to use their favorite tools in a unified console, but,
most importantly, these functionalities are loosely coupled with the platform since they are pluggable and optional.
Deep Dive With KubeSphere- features
Multi-cluster Management and Deployment
With KubeSphere, users can manage the infrastructure underneath, such as adding or deleting clusters. Heterogeneous clusters deployed on any infrastructure (for example, Amazon EKS and Google Kubernetes Engine) can be managed in a unified way. This is made possible by a central control plane of KubeSphere with two efficient management approaches available.
There are two efficient management approaches available to manage the infrastructure underneath by a central control plane of KubeSphere-
Solo: Independently deployed Kubernetes clusters can be maintained and managed together in the KubeSphere container platform.
Federation: Multiple Kubernetes clusters can be aggregated together as a Kubernetes resource pool. When users deploy applications, replicas can be deployed on different Kubernetes clusters in the pool. In this regard, high availability is achieved across zones and clusters.

DevOps Support
KubeSphere provides a pluggable DevOps component based on popular CI/CD tools such as Jenkins.
It features automated workflows and tools including binary-to-image (B2I) and source-to-image (S2I) to package source code or binary artifacts into ready-to-run container images.
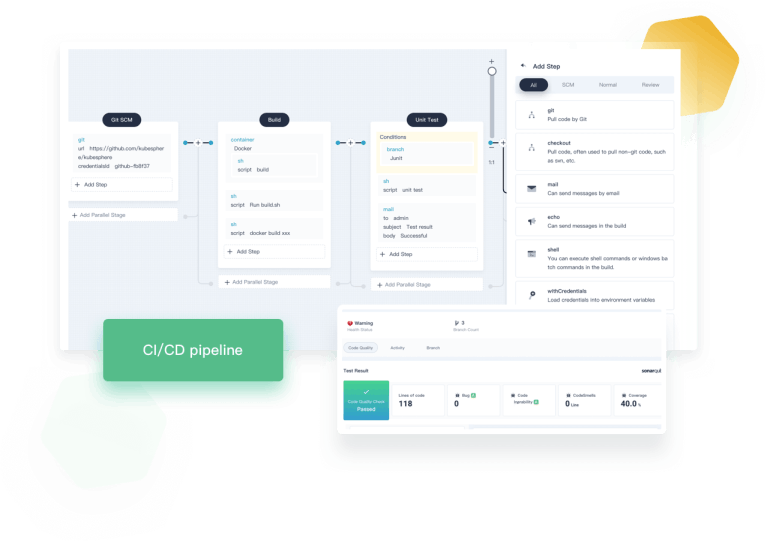
CI/CD Pipeline
- Automation: CI/CD pipelines and build strategies are based on Jenkins, streamlining and automating the development, test, and production process. Dependency caches are used to accelerate build and deployment.
- Out-of-box: Users can ship their Jenkins build strategy and client plugin to create a Jenkins pipeline based on Git repository/SVN. They can define any step and stage in the built-in Jenkinsfile. Common agent types are embedded, such as Maven, Node.js, and Go. Users can customize the agent type as well.
- Visualization: Users can easily interact with a visualized control panel to set conditions and manage CI/CD pipelines.
- Quality Management: Static code analysis is supported to detect bugs, code smells and security vulnerabilities.
- Logs: The entire running process of CI/CD pipelines is recorded.
Traffic Management
- Canary release represents an important deployment strategy of new versions for testing purposes. Traffic is separated with a pre-configured ratio into a canary release and a production release respectively. If everything goes well, users can change the percentage and gradually replace the old version with the new one.
- Blue-green deployment allows users to run two versions of an application at the same time. Blue stands for the current app version and green represents the new version tested for functionality and performance. Once the testing results are successful, application traffic is routed from the in-production version (blue) to the new one (green).
- Traffic mirroring enables teams to bring changes to production with as little risk as possible. Mirroring sends a copy of live traffic to a mirrored service.
- Circuit breaker allows users to set limits for calls to individual hosts within a service, such as the number of concurrent connections or how many times calls to this host have failed.
Multi-tenant Management
Resources (for example, clusters) can be shared between tenants in KubeSphere
- Multi-tenancy. It provides role-based fine-grained authentication in a unified way and a three-tier authorization system.
- Unified authentication. For enterprises, KubeSphere is compatible with their central authentication system that is base on LDAP or AD protocol. Single sign-on (SSO) is also supported to achieve unified authentication of tenant identity.
- Authorization system. It is organized into three levels: cluster, workspace and project. KubeSphere ensures resources can be shared while different roles at multiple levels are completely isolated for resource security.
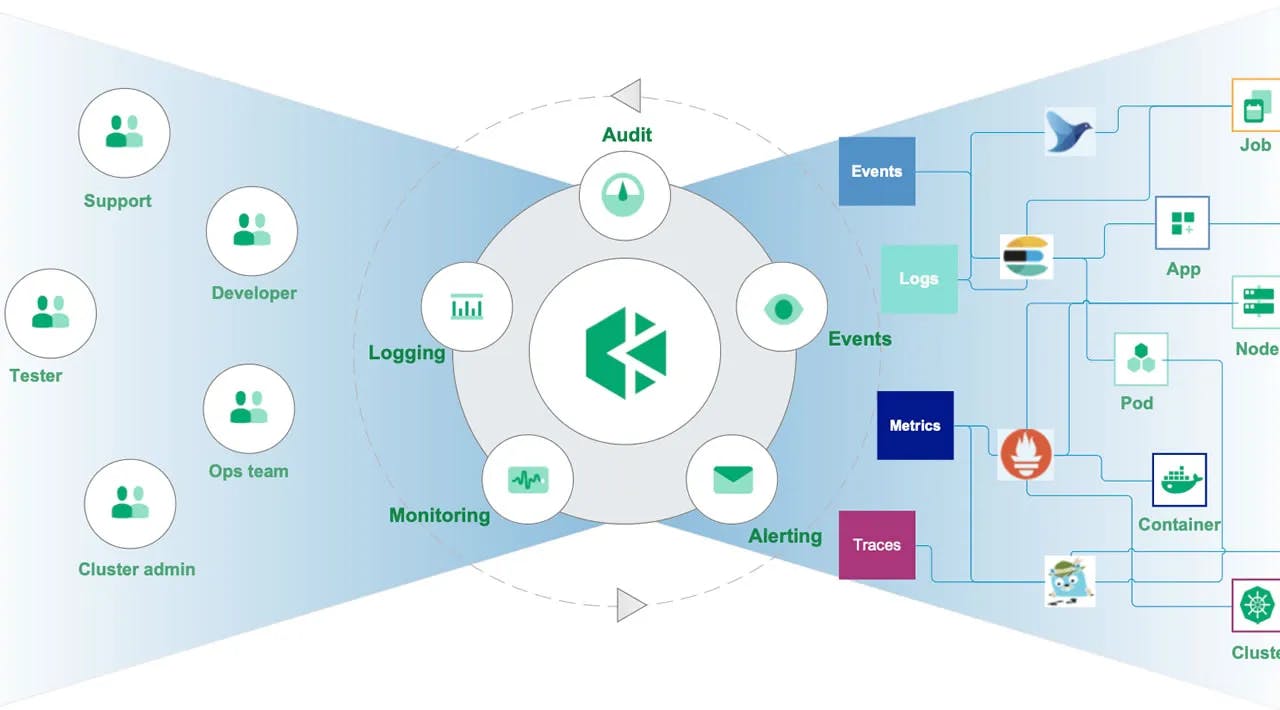
Log Query and Collection
- Multi-tenant log management. In KubeSphere log search system, different tenants can only see their own log information. Logs can be exported as records for future reference.
- Multi-level log query. Users can search for logs related to various resources, such as projects, workloads, and pods. Flexible and convenient log collection configuration options are available.
- Multiple log collectors. Users can choose log collectors such as Elasticsearch, Kafka, and Fluentd. On-disk log collection. For applications whose logs are saved in a Pod sidecar as a file, users can enable Disk Log Collection.
Multiple Storage Solutions
- Open source storage solutions are available such as GlusterFS, CephRBD, and NFS.
- NeonSAN CSI plugin connects to QingStor NeonSAN to meet core business requirements for low latency, high resilience, and high performance.
- QingCloud CSI plugin connects to various block storage services in QingCloud platform.
Multiple Network Solutions
Open source network solutions are available such as Calico and Flannel.
OpenELB, a load balancer developed for bare metal Kubernetes clusters, is designed by the KubeSphere development team. This CNCF-certified tool serves as an important solution for developers. It mainly features:
- ECMP routing load balancing
- BGP dynamic routing configuration
- VIP management
- LoadBalancerIP assignment in Kubernetes services (v0.3.0)
- Installation with Helm Chart (v0.3.0)
- Dynamic BGP server configuration through CRD (v0.3.0)
- Dynamic BGP peer configuration through CRD (v0.3.0)
Kubesphere Installation
Make sure that your Kubernetes cluster meets all the requirements, just check the kubectl version, after that you are good to go for KubeSphere.
- Execute the following commands to start installation:
kubectl apply -f https://github.com/kubesphere/ks-installer/releases/download/v3.2.1/kubesphere-installer.yaml

kubectl apply -f https://github.com/kubesphere/ks-installer/releases/download/v3.2.1/cluster-configuration.yaml
- Inspect the logs of installation:
kubectl logs -n kubesphere-system $(kubectl get pod -n kubesphere-system -l app=ks-install -o jsonpath='{.items[0].metadata.name}') -f
- Use kubectl get pod --all-namespaces to see whether all pods are running normally in relevant namespaces of KubeSphere. If they are, check the port (30880 by default) of the console through the following command:
kubectl get svc/ks-console -n kubesphere-system
- Make sure port 30880 is opened in security groups and access the web console through the NodePort (IP:30880) with the default account and password (admin/P@88w0rd).

Air-gapped Installation on Kubernetes
This installation is as like same the online installation except that you must create a local registry to host Docker images.
Step- 1 Prepare a Private Image Registry
- Generate your own certificate by executing the following commands:
mkdir -p certs
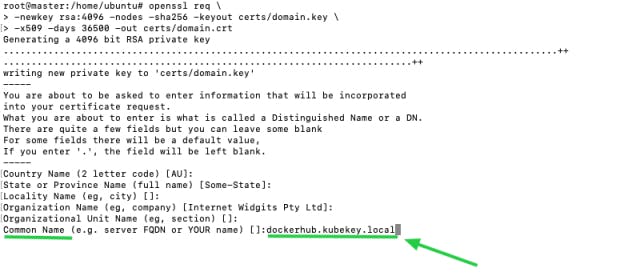
openssl req \
-newkey rsa:4096 -nodes -sha256 -keyout certs/domain.key \
-x509 -days 36500 -out certs/domain.crt
- Make sure you specify a domain name in the field Common Name when you are generating your own certificate. For instance, the field is set to dockerhub.kubekey.local in this example.
- Start the Docker registry
Run the following commands to start the Docker registry:
docker run -d \
  --restart=always \
  --name registry \
  -v "$(pwd)"/certs:/certs \
  -v /mnt/registry:/var/lib/registry \
  -e REGISTRY_HTTP_ADDR=0.0.0.0:443 \
  -e REGISTRY_HTTP_TLS_CERTIFICATE=/certs/domain.crt \
  -e REGISTRY_HTTP_TLS_KEY=/certs/domain.key \
  -p 443:443 \
  registry:2
- Configure the registry
-- Add an entry to /etc/hosts to map the hostname (i.e. the registry domain name; in this case, it is dockerhub.kubekey.local) to the private IP address of your machine as below.
# docker registry
192.168.0.2 dockerhub.kubekey.local
-- Execute the following commands to copy the certificate to a specified directory and make Docker trust it.
mkdir -p /etc/docker/certs.d/dockerhub.kubekey.local
cp certs/domain.crt /etc/docker/certs.d/dockerhub.kubekey.local/ca.crt
Step- 2 Prepare Installation Images
- Download the image list file images-list.txt from a machine that has access to the Internet through the following command:
curl -L -O https://github.com/kubesphere/ks-installer/releases/download/v3.2.1/images-list.txt
- Download offline-installation-tool.sh.
curl -L -O https://github.com/kubesphere/ks-installer/releases/download/v3.2.1/offline-installation-tool.sh
- Make the .sh file executable:
chmod +x offline-installation-tool.sh
- You can execute the command ./offline-installation-tool.sh -h to see how to use the script:
root@master:/home/ubuntu# ./offline-installation-tool.sh -h
Usage:

  ./offline-installation-tool.sh [-l IMAGES-LIST] [-d IMAGES-DIR] [-r PRIVATE-REGISTRY] [-v KUBERNETES-VERSION ]

Description:
  -b                     : save kubernetes' binaries.
  -d IMAGES-DIR          : the dir of files (tar.gz) which generated by `docker save`. default: ./kubesphere-images
  -l IMAGES-LIST         : text file with list of images.
  -r PRIVATE-REGISTRY    : target private registry:port.
  -s                     : save model will be applied. Pull the images in the IMAGES-LIST and save images as a tar.gz file.
  -v KUBERNETES-VERSION  : download kubernetes' binaries. default: v1.21.5
  -h                     : usage message
- Pull images in offline-installation-tool.sh.
./offline-installation-tool.sh -s -l images-list.txt -d ./kubesphere-images
Step 3: Push Images to Your Private Registry
Transfer your packaged image file to your local machine and execute the following command to push it to the registry.
./offline-installation-tool.sh -l images-list.txt -d ./kubesphere-images -r dockerhub.kubekey.local
Note: The domain name is dockerhub.kubekey.local in the command. Make sure you use your own registry address.
Step 4: Download Deployment Files
- Execute the following commands to download these two files and transfer them to your machine that serves as the task box for installation.
curl -L -O https://github.com/kubesphere/ks-installer/releases/download/v3.2.1/cluster-configuration.yaml
curl -L -O https://github.com/kubesphere/ks-installer/releases/download/v3.2.1/kubesphere-installer.yaml
Edit cluster-configuration.yaml to add your private image registry. For example, dockerhub.kubekey.local is the registry address in this tutorial, then use it as the value of .spec.local_registry as below:
spec:
  persistence:
    storageClass: ""
  authentication:
    jwtSecret: ""
  local_registry: dockerhub.kubekey.local # Add this line manually; make sure you use your own registry address.
Note: You can enable pluggable components in this YAML file to explore more features of KubeSphere. Refer to Enable Pluggle Components for more details.
- Save cluster-configuration.yaml after you finish editing. Replace ks-installer with your own registry address with the following command:
sed -i "s#^\s*image: kubesphere.*/ks-installer:.*# image: dockerhub.kubekey.local/kubesphere/ks-installer:v3.0.0#" kubesphere-installer.yaml
Warning: dockerhub.kubekey.local is the registry address in the command. Make sure you use your own registry address.
Step 5: Start Installation
Execute the following commands:
kubectl apply -f kubesphere-installer.yaml
kubectl apply -f cluster-configuration.yaml
Step 6: Verify Installation
When the installation finishes, you can see the content as follows:
#####################################################
###              Welcome to KubeSphere!           ###
#####################################################

Console: http://192.168.0.2:30880
Account: admin
Password: P@88w0rd

NOTES:
  1. After logging into the console, please check the
     monitoring status of service components in
     the "Cluster Management". If any service is not
     ready, please wait patiently until all components
     are ready.
  2. Please modify the default password after login.

#####################################################
https://kubesphere.io             20xx-xx-xx xx:xx:xx
#####################################################

Reference And Conclusion
So, I am concluding my blog here. Lots of things I got to know and I'm glad to get the opportunity to share my learning with you all about KubeSphere.
Thanks to KubeSphere Thanks to Kunal Kushwaha Thanks to Saiyam Pathak